Opening the chat window
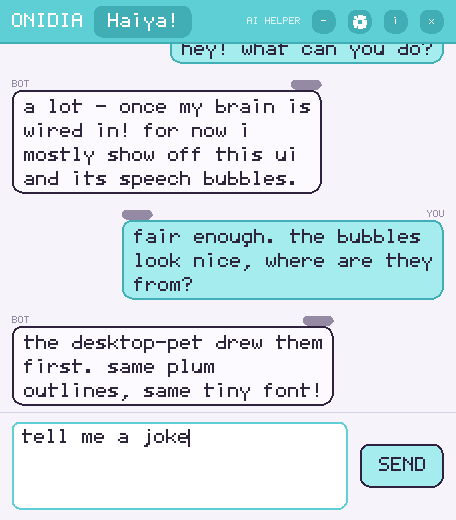
Onidia is two programs. Onidia Chat is the window you talk to her in; Onidia is the little character who lives on your desktop. Start with the window — it is the one that checks your keys and tells you when something is wrong.
From the start menu
Open the applications menu and go to Internet. Chat clients live there alongside browsers and mail, which is why she is filed under it rather than under Games.
That is the window. The character on your desktop is a separate entry called Onidia, under Games — see the next section.
From a terminal
onidia-chat
Both programs are installed into your PATH, so they work from any directory and you never need the full path. No Onidia yet? The install section has a one-liner that works out which build your machine needs.
One thing the installer deliberately does not do for you: put her config where she
looks for it. The package installs it to /opt/onidia/share/chat-app.ini and leaves
your home alone, because a file written there by apt would be root-owned and you
could not edit your own key afterwards. So once, before the first launch:
mkdir -p ~/.config/chat-app
cp -n /opt/onidia/share/chat-app.ini ~/.config/chat-app/   # -n never overwrites yours
Skip it if you use environment variables instead of the file, and a setup guide for the provider you picked will usually write it for you.
First launch
She checks the environment before the window opens and tells you plainly what is missing rather than failing mysteriously later. If she has nothing to think with yet, you will be sent to one of the setup guides — Gemini is the five-minute option. Once she is wired up, she greets you once when the window opens.
Bringing Onidia on screen
She is the small anime character who sits on your desktop and reacts to what she says. Three ways to start her; they all do exactly the same thing.
The Haiya! button — the usual way
There is a pill in the header of the chat window that says Haiya! Click it and she appears on your desktop.
Teal means she is not running and the button will bring her on screen. Pink means she is already running and the same button will send her away. Nothing is ambiguous, and there is only ever one of her — you do not get two Onidias, you get one appearing and then leaving.
From the start menu
Games → Onidia. She is a companion, not a utility, so that is where the menu puts her.
From a terminal
onidia
If you are starting both by hand, start her first. She creates the little speech pipe that the chat window writes into, so the window has something to talk to.
Sending her away
She never vanishes abruptly. She says goodbye, waves and poofs out — both ways out do that, so whichever you pick she leaves politely.
The Haiya! button
While she is running the button is pink. Click it and she picks a farewell, waves and disappears. The button goes back to teal, ready to bring her on screen again.
Right-click the character
Right-click her on the desktop and she poofs out and closes. The quickest way to clear her when the chat window is behind something else.
Press Ctrl-C in that terminal. It is the plainest exit of the three, and unlike the other two it skips the goodbye.
Talking instead of typing
A microphone button sits in the input bar, to the left of the box where you type. It is only drawn when speech input is switched on, so if you cannot see it that is the reason — not a bug.
Using it
Two settings in the gear menu make that faster. Auto stop ends the take when you stop talking, so you never have to find the button again. Auto submit sends it the moment transcription finishes, turning the whole thing into a conversation with no typing at all.
What it needs
Two things, both outside Onidia: a way to record, and something to do the recognising.
sudo apt install pipewire-bin alsa-utils pulseaudio-utils
She looks for a recorder in this order and takes the first one it finds:
pw-record, parecord, arecord, ffmpeg.
Those three packages cover the first three — pipewire-bin for
pw-record, pulseaudio-utils for parecord,
alsa-utils for arecord — and any one of them is enough on its
own. Add ffmpeg only if you would rather she used that.
Choosing what does the listening
Set stt in your config file to one of three backends.
stt = whisper

# and, only if you have more than one microphone:
stt-device = hw:2,0
transcribe is the default. It uses Amazon Transcribe, which is quick and accurate but
needs AWS credentials allowed to call transcribe:StartStreamTranscription.
whisper runs the recognition on the Pi itself, so nothing is sent anywhere and there is
no bill — slower on a Pi, but private. off takes the microphone button away
again.
Leave stt-device empty and she uses the system default. Fill it in with a
PipeWire node name for pw-record or parecord, or an ALSA device
such as hw:2,0 for arecord and ffmpeg.
The two are independent. If you close the window while she is still on your desktop, she stays there. Send her away with one of the two methods above.
Settings, field by field
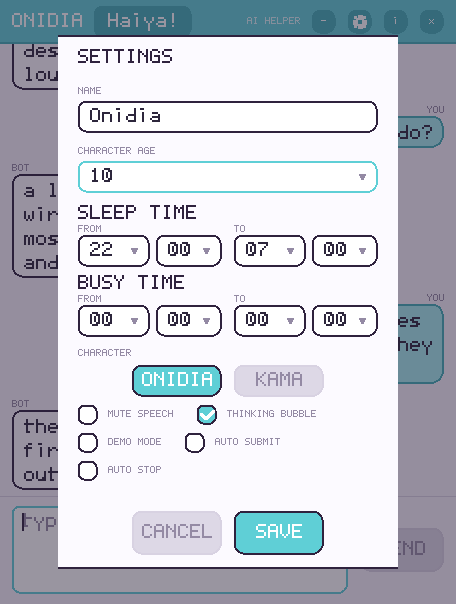
The gear in the chat window header. Everything below is optional — the defaults are sensible — but these are the dials you are meant to turn.
Name
What she calls herself. It replaces the name in her persona, so she signs her replies as that. Clearing the field does not erase the name she already had — it goes back to whatever her prompt originally said.
Character age
A dropdown from 7 to 13, starting on 10. She is told her age and keeps her replies age-appropriate, which is the single easiest way to change how much she talks down to you.
Sleep time and busy time
Both are a from and a to, to the quarter hour, and both understand windows that run past midnight — set sleep to 22:00 → 07:00 and it means what it looks like.
Sleep time
She is told the schedule, so a message that lands inside those hours catches her sleepy and half-asleep. It also stops her greeting you at startup while she is asleep.
Busy time
Keeps unprompted messages from interrupting her. She will not break off to greet you while she is in the middle of something.
Sleep time and busy time are saved to ~/.config/chat-app/chat-app.ini, and
onidia the buddy looks in exactly the same places for it as the window does. You set
it once, and both halves of her obey it.
Character: Onidia or Kama
Which of the two she appears as. It takes effect the next time she is launched, so save the settings and then use the Haiya! button (or right-click her away first). See Kama below.
The five checkboxes
Mute speech stops her saying anything out loud while still showing every reply as text. Thinking bubble shows that she is working instead of leaving you at a blank box. Auto submit and Auto stop belong to the microphone and are explained under talking instead of typing.
Demo mode
Off by default, and the difference is big. Off means she is planted: she stays where she is and only reacts when you speak to her. On means she roams and chatters — she wanders the desktop and starts conversations on her own.
Demo mode is the entertaining one. Turn it on, leave her alone, and go and do something else. Just know she will use the provider while she does, so it costs tokens while you are not watching.
Save writes your choices into ~/.config/chat-app/chat-app.ini,
so they survive a restart. Cancel throws the whole panel away and leaves the
previous settings untouched.
onidia the buddy reads that same file, so a change made here is a change made for both of them.
If you start her inside her own sleep time or busy time, the greeting is skipped on purpose and the window just opens quietly. That is not a failure.